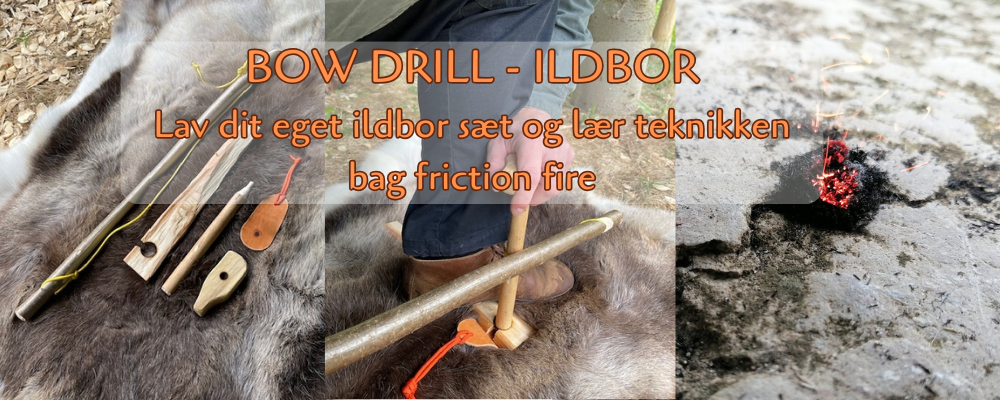
Fire drill / Bow drill.
A "bow drill" refers to an ancient method of making fire using a rotating wooden stick or "drill," a bow, and a fireboard. This is a technique that has been used for millennia by people around the world, especially those living in nature. Today, it is an essential tool for bushcraft enthusiasts to create fire, and the technique is therefore important to learn if you want to use natural materials to make fire.
The bow drill method is an important bushcraft skill to master, both for beginners and experienced bushcrafters.
In this blog, you will be taken through a step-by-step bushcraft guide where we cover, among other things, the choice of wood types, techniques, safety, and much more related to bow drilling.
The historical perspective:
The first controlled use of fire was probably by hominids/ape-men who occasionally exploited natural wildfires.
They have tried in various ways to "keep the fire alive" or direct it using fuel and/or wind.
We have to go back 40,000 years before there is evidence that fire was controlled to some degree.
Real control over fire.
At some point, an individual succeeded in creating fire themselves, which was life-changing for that person and everyone around them.
Some of the earliest methods probably originated from flint striking/spark ignition or friction heat/rubbing heat.
Bow drill is an advancement of an earlier and more primitive method, namely the "hand drill." This method also relies on friction heat from a "wooden drill," but is manipulated solely by hand.
Bow drill is a method that requires several components and preparation, but it definitely offers a higher success rate when trying to make fire.
The bow drill method:
It is not easy to determine when in history the bow drill was first used.
There are various finds and depictions that go far back before our era.
These images prove the use, but not that it was the first time the method was used.
In general, it was not until about 7,000 years ago that we can be sure there were methods that made it common and widespread practice to create fire.
Meaning that it was certainly not done by just a few individuals or small groups.
Let's get started with the practical.
What you will need:
-A knife. possibly a small axe.
-A durable cord, for example paracord (parachute cord) but it is also possible to use natural cord or a flat leather strap.
-You also need to go out and find the natural materials you will use to make your bow drill kit.
The set consists of: (all parts in the set must be made of dry wood)
A socket, or a grip.
A spindle or drill.
A board or a base board.
A bow
Last but not least, you need an ember bundle catcher. (Ember catcher) This could be a dry leaf, a large wood shaving, a piece of leather, or a piece of bark.
Here is an example of how it could look, but remember nature can easily provide something useful.

Here is a list of the wood types you could use to make your bow drill set:
Spruce
Willow.
Hazel.
Cedar.
Cottonwood
Basswood
Aspen
I would recommend that you start by using the same wood type for both board and spindle (drill).
For example, spruce has a high success rate and is easy to recognize and find in many places.
Afterwards, you can start experimenting with combinations of wood types.
Bushcraft measuring stick:
When making different things in wood, you quickly learn to use different body dimensions to measure with.
A width can, for example, be a “thumb’s width.”

It is a primitive but good way to take a measurement when you don’t have a ruler available.
The method is especially useful when you need to make several identical items.
Base board: should be the length of your forearm, which by the way is the same length as your foot.
There should be something to step on to hold it steady, and it should be made fairly straight so it doesn’t wobble.

The board should not have bark remnants or moss on it, and it should have roughly perpendicular edges.
The board should be made of dead wood, but not rotten.
It should be 2-4 fingers wide and a thumb’s width thick.
The length and width of the board allow you to reuse the board; you can simply have several holes in a line.
👉 If your wood has heartwood, try to avoid it. It is denser in nature and therefore not as good as the sapwood.
Last but not least, we must mention the “nail test.”
You can test your base board by letting your nail slide over the board.
You should easily be able to make a scratch on the surface when you press your nail into the board.
You should have the feeling that the board is a bit papery, i.e. light and soft.

Spindle:
Preferably from the same wood as you took the board from.
(dead wood, just not rotten).
The spindle should have a length corresponding to the distance between your thumb and little finger on your spread, and extended fingers (finger tips).

Later you can start working with longer drills/spindles, but during the learning phase, it is not an advantage. There is enough to balance in your setup.
The spindle is about a thumb’s width thick, like the board.
The spindle should be crowned (slightly rounded) at the end facing the board, and pointed at the end facing the grip/socket.
When carving this part, think of a large pencil or the Eiffel Tower, this will minimize friction against your grip.

Grip/Socket:
The grip should feel good in the hand and preferably be harder in texture than the rest of the kit’s parts.
It could be made from stone, bone, metals, or hard wood types.
If you make the grip from wood, make it slightly too thick.
When the hole burns deeper and eventually becomes too deep, you can split off a slice and continue using the same grip.
Here is an option for shaping, you don’t need to make yours exactly the same, it just needs to feel good in your hand.

Carve the piece of wood, here an oily wood type is chosen, which also reduces friction against your hand.


Notice the small bowl-shaped indentation, it should catch the sharp tip of your drill/spindle. Made with your knife tip!

The bow:
It should be a length that fits the distance between your armpit and your fingertips.
The bow can be straight or curved, but it must not be flexible!

If you want to save the bow and reuse it, maybe carry it around, then choose a relatively light wood!
The bow can be flattened on the side facing the drill, but it is not necessary. By doing this, you make the bow a bit lighter. Likewise, you remove any growths that might get in the way of the bow "running freely."

At the end closest to your hand, (the bow is held at one end) a double-sided saddle notch is cut.
Also note that the grip is rounded down towards the flat side of the bow!
This makes it easier to hold during use.

Now the stick is made thinner at the spot where you want to make the hole, thus there is less material to make the hole through.
Regarding the hole itself, there are two methods I want to mention here.
One method is to cut a hole, which is the method that gives the best result.
The second method is most like drilling the hole, it is faster but also carries a risk of splitting the wood.
First and foremost, both methods require a sharp, and not too thick, knife blade.
Cutting the hole:
Use the tip of your knife and mark the thickness of the hole, you form two lines across the wood grain.


The distance between the two lines will determine the length of the hole.
Now press along the grain in the wood, and you have formed a square, maybe elongated? That’s okay.

The most important lines are those that go across the grain. (The first ones you made).
Now you can start to lift the small square block up, continue the process and before long you will have gone through.
If you want to prevent the wood from “fraying” on the opposite side, cut the last part of the hole from the opposite side. Aim carefully and make sure the holes line up!

Bushcraft tip: Optionally cut some guide lines.


Method 2 (drill hole): use your knife tip again, twist it where you want the hole. Keep going until the tip just appears on the other side, then turn the piece and finish drilling from the other side.
With this method, the hole becomes more frayed, and as previously described, there is a risk of the wood splitting. Don’t press too hard; let the knife work as it is turned.
It can definitely be an advantage to use an awl with this method (a needle-like tool found in many folding knives).
X becomes V (pothanger notch)
Now you need to cut a V notch that will hold the bowstring tight, farthest from your hand.
Note that it should be made on the “back side” of the bow!
With your knife blade, press a cross onto your stick, press firmly into the wood.

The top part of the cross is removed, so that you only have a V shape left.

The V “points” toward the end of the stick close by!
The V can be a bit slanted, so it “bites” better into the string.
Clean up your cuts, optionally remove a bit of the tip of your V shape.
You can definitely have notches or holes at both ends of your bow.
Here we perform both methods on the bow, so you get to know different ways to make the bow.

Attach the bowstring.
The bowstring:
Next is a way to attach the bowstring/cord to the bow, but it’s definitely not the only way to do it.
There are countless ways; it doesn’t matter which method you use.
Just remember and repeat it over time.
Bushcraft tip: Make, for example, a clove hitch which gives you a loop to place on your V notch, then lead the string down to the hole at the opposite end of your bow.


Now thread the string through the hole in the bow, you now have the option to make a Slipknot on the other side. This way you can quickly adjust the tension on your bowstring without having to tie all sorts of knots.


Bushcraft advice for the next steps.
Using your kit/bow drill set:
-Be patient.
-Be aware of your entire body.
-remember this is difficult, there are many components to keep track of.
Most people are so focused on succeeding in their endeavor that they don’t notice their own body.
Most people start to sweat, get out of breath, and experience a lot of muscle tension.
You can become "cramped up" and lose your overview.
Therefore, it can definitely be an advantage to take a break, step away, and loosen your body. Afterwards, you can return and try again with fresh eyes.
I will avoid describing how to position your whole body in relation to the actual execution.
This will be a very long and complicated description.
I just encourage you to look at the pictures here.

However, I want to specify that regarding the arm holding the grip/socket, it’s important that your forearm and wrist are against your shinbone. That way you “lock” your whole “setup.”
The back leg is out of the way so you don’t hit it with the bow.
Remove loose clothing or objects that might get in the way, e.g., a knife on your belt.

Continuing with your set preparation:
Now take your knife and make a small indentation in your board, so the spindle has something to spin in. The indentation just needs to be big enough to “catch” the spindle.
The back leg is out of the way so you don’t hit it with the bow.
Remove loose clothing or objects that might get in the way, e.g., a knife on your belt.


Now you need to do what’s called a “burn in”. That means preparing your board. By doing a "burn in" you fit the board and spindle together.
Bushcraft tip: See here how to attach the spindle to the bow:


Begin slowly moving the bow in long strokes, just like sawing.
Use the whole bowstring!
You should blacken the board and spindle, but you don’t need to produce any dust yet.
Maybe a little smoke will come, that’s fine.


Notch in the board.
Now you need to make a notch in the board. It’s probably best described as a pizza slice.
Bushcraft tip: Use a smaller saw if possible, it makes it easier.
You don’t need to cut all the way to the middle, but almost.

Notice that the notch (pizza-slice) is wider at the base, which creates a bit more space under the board, which can be an advantage.
The sides of the notch should be as smooth as possible, so your ember releases more easily. Likewise, there is less chance of the ember falling apart when you remove the board.

Now you are ready to make fire.
Remember to have your bundle (bird’s nest), tinder, and kindling ready before you start your first attempt!
Your bundle can be grass, bark, and contain dry ferns, oily grass seeds, down feathers, just to name a few possibilities.
The finest and most flammable material is on the inside!
Everything must of course be completely dry!
A classic mistake is actually managing to create a glowing ember, but not having any tinder ready. This causes the ember to go out before you find material for the fire.

Start with long steady strokes, you shouldn’t use too much force from the start.
Just warm up the set.
Any smoke should preferably only come from the contact point between the board and the spindle (drill).
At some point when you get smoke, you can start to increase the speed.
Remember to save energy for a final sprint before the finish line!
Your goal is for a dark brown or almost black ember pile to gather under the board.
Watch for it; when it appears, the smoke usually gets stronger.
Now carefully remove the spindle and bow, gently tap the board with a hard object.
This way the ember pile won’t stick to your board.
Now you have a glowing ember pile lying on your ember board.

And now… no panic…!
You have plenty of time, as long as your pile is big enough. If it is big enough, you will have 5 - 10 minutes for the next steps.

Gently blow on the ember pile if necessary. Or better, let the wind do it for you. You can also gently fan the ember pile with your hand.

Now place the ember in your prepared tinder (bird’s nest).

Carefully close your bird’s nest around the ember like a taco, start gently blowing a little air into the nest. You should apply some pressure around the ember, but not too hard.
As stronger smoke appears, you can also blow harder.
The stronger the smoke, the closer you are to getting fire.

Bushcraft tip: Remember to hold your bird’s nest in front of your face and not under your face. If it catches fire, you might burn your beard or eyebrows.
You have now created friction fire!
Place the small twigs on to build up the fire.
Troubleshooting:
If a whistling sound occurs in the middle of it all, try pressing down harder.
If you can’t press harder, use a bit more body weight.
You can also look at the top part of your spindle/drill.
Has it developed “shoulders”? If it has... then it needs to be sharpened again like a pencil (the Eiffel Tower).
Congratulations, well done, it’s not easy!
The book Bushcraft in the Nordic Countries by bushcraft expert Jesper Hede is a fantastic book if you want to learn more about primitive fire and bushcraft in general.
The Mora Garberg knife is of exceptionally strong quality with a full tang blade and a handle made of polyamide in particularly durable quality. The Mora Garberg knife is the ultimate bushcraft knife.
You can use paracord for your bow drill bow.
Here you can choose between different colors of the strong paracord rope.

You can also get a Bow Drill starter kit, which includes all the components. Here you don’t get the joy of making the bow drill yourself – BUT, it’s a good way to get familiar with the technique before you dive into making your own set.
What exactly is Bushcraft? Would you like to learn more about bushcraft, techniques, methods, history, and everything else the concept of bushcraft covers?
You can learn a lot more about bushcraft right here.
