Punk wood... how do I make it myself?
|
|
Time to read 7 min
|
|
Time to read 7 min
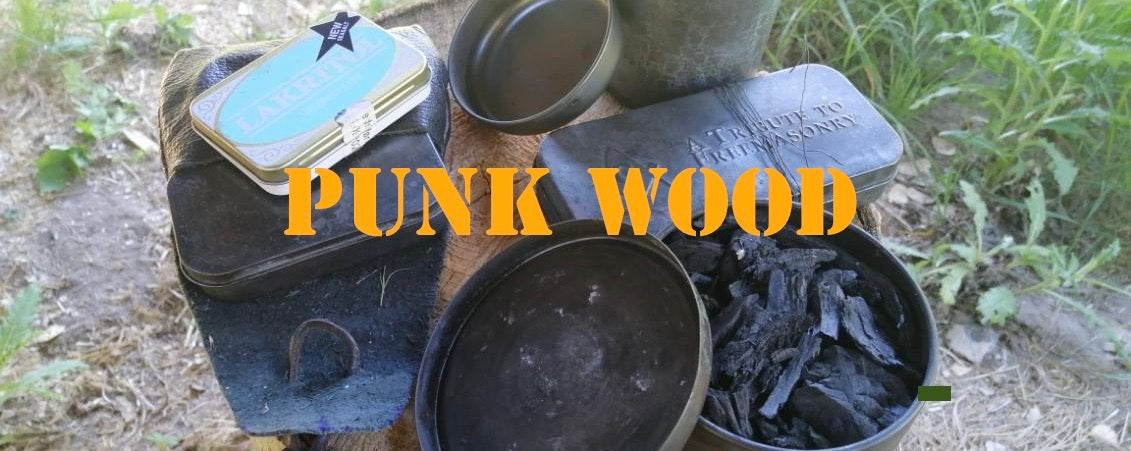
Charred punk wood, or just punk wood.
First, what is charred material anyway, and what is the advantage of it?
A charred material is a charred organic material, in this case punked wood (wood that has already been decomposed by a fungus in nature).
It happens because the material is deprived of oxygen during combustion, so it chars without disappearing.
In short, it makes it super easy to get fire going again.
Just like with processed charcoal.
You might already know it from when you have made a fire? It’s often quite easy to get your fire going again if it has only recently gone out.
That said, it doesn’t mean you can just take leftovers from your fire, put them in a tin can, and then use them next time you go on a trip.
Punk wood is definitely preferable, but luckily it’s very easy to make and find, so read on here.
The charred punk wood method definitely works best if the burnt/charred wood has been of a rotten nature, what is called punked wood in English.
That is wood with an airy structure, a bit like a sponge, which no longer has its original durability where it is solid and hard.
As soon as you know what it looks like, it’s really easy to find, even in large quantities.
The charred punk wood is traditionally used together with flint and steel, that is, flint striking.
Advantages: First and foremost, the method is free, and the raw material is found almost everywhere in nature. When your brought kindling material runs out, you still have options with charred material (here punk wood).
Disadvantages: you need to have fire to carry out the method, meaning you are "one fire behind" if you don’t have the ability to create fire by another method.
You need to be able to create a fire from an ember, and there can be a big difference between lighting a fire from an ember or a real flame.
The ember method can be compared to what you do when you create fire with a "Bow drill" or "flint striking". Therefore, part of the method is practicing making a tinder bundle/bird's nest. The combustible material to which the ember is transferred to start a flame.
Of course, you can also do something in between the ember method and more modern methods. For example, you could ignite your charred punk wood with a modern fire steel. Then you can practice blowing fire into a tinder bundle/bird’s nest.
Where should I look for my punk wood material? There’s not much point in going into a production forest, as these are constantly cleared, and old trees are removed to keep paths clear.
No, you need to find a forest where trees are allowed to remain on the forest floor. If that’s not available near where you live, look for leftover tree stumps from previous logging.
The punk wood pieces you collect should not fall apart in your hands; if they do, they are too affected by fungus and rot.
Think of a kitchen or bath sponge; the piece should have a texture as close to these as possible.
When you touch a piece of punk wood, it can be compared to the feeling of touching corrugated cardboard, styrofoam ("flamingo"), or other light and airy materials.
Take more punk wood material than you need, as there is some loss in the process.
What else do I need?
Tools: One of the following hand tools:
-A metal drill/drill machine or hand crank.
-An awl or similar tool.
-A nail.
To produce your charred punk wood material, you will need a container, for example an old tea tin or a paint bucket.
See what you have stored away, otherwise you can look in a hardware store.
Buy a few pieces, so you have more options as you gain experience.
You will probably also find that some of the containers can’t withstand the process.
Choose a container that isn’t too large to start with; you can always try more experiments later.
Most people make a hole right in the middle of the can, which works fine. However, I would recommend making a hole in the side of the can, where the lid and can overlap. I will explain why later.
Fill the container with the ‘raw’ punk wood, you don’t need to worry if the wood is damp, that’s okay. You have a better chance of a good result if the wood is dry, but it’s not necessary for a good outcome.
Now place the can on a small fire, it does not need to be a raging fire. Not much is needed.
Soon you will start to see smoke/steam coming out of the small hole.
The smoke gases can catch fire, so a small flame may come from the hole. This is not a big deal; hold something over the hole for a few seconds, or turn the can in the fire.
At some point, the smoke will stop coming out of the hole. Then it is time to close the hole.
Optionally use a couple of sticks to lift the can out of the fire; it is also possible to attach a small wire handle to the can before placing it in the fire. This makes it easier to get it out of the fire again.
Stick a small stick in the hole, or place the hole down against sand or soil.
You need to be sure that the oxygen supply is stopped, so your punk wood does not turn to ash!
I promised earlier to explain why I would drill a hole in the side of the can.
When the lid is turned, the hole closes, and the oxygen supply stops.
Another reason is that the can cannot be used for anything else when it has a hole in it; the contents can "leak out".
When the lid is turned and the two holes are no longer aligned, the container is sealed again.
Now the can needs to be allowed to cool down.
When the can is cold or tempered, it can be opened.
If not all your punk wood is blackened, then the can needs to go back on the fire. The pieces that have not turned completely black are bad and will not work properly.
To use your newly made tinder material, you need something to put it in.
A "tinder-bundle", or as it is called in Danish, a "bird's nest".
What do you need for this?
We can divide the components a bit. Some work best in the outer part of the "nest" and others in the innermost part, where your ember lies.
Here are some examples:
Outer:
Grass.
Birch bark (can retain heat when you breathe on it, has high oil content).
moss (embers).
Ferns (dry/brown).
Thuja bark (rubbed and divided)Innermost).
Middle:
Moss (embers).
Shavings/wood wool, fatwood, ferns (dry/brown).
Thuja bark (rubbed and divided)Innermost).
Innermost (near ember):
Shavings/wood wool.
Cattail fluff.
Flower seeds from, for example, thistles and willow. (the white cotton-like stuff that flies around in summer).
Oily grass seeds. (can pop/spark!)
Thuja bark (rubbed and divided)
Pocket wool (cotton).
The goal is to rub/twist the material and make it look like a bird's nest.
Imagine that there should be room for a couple of small eggs in it.
When your punk wood glows, place it in your bird's nest and blow gently.
The more smoke that comes from your bird's nest, the closer you are to getting fire.
It is only when the smoke becomes thicker that you can also blow harder.
Press/squeeze a little around the bird's nest so you know your ember is in contact with the tinder.
Reuse of your metal can.
Remember to make more charred punk wood for your next fire, once you have started your current fire!!!
Over time, you will find a suitable size can for the purpose.
Maybe you only need to make new punkwood every third time you make a fire?
Maybe you just need to top it up a bit? Temporarily empty the can's contents. Make a canful which will shrink a bit, and top it up with your "old punkwood".
In the end, however, you will have to empty the can and throw out the old material. Eventually, the remains will be too small and crumbly to be usable.
It is possible to make punkwood in small cans down to 20 g, but then there is probably only enough for a maximum of two fires.
If you want new metal cans, it is possible to find some cheap ones at, for example: Normal or Søstrene Grene.
Finally, I want to mention that it is possible to make charred materials without having a can.
Make a fire...
When you have good embers (black pieces of charcoal).
Then throw sand over the fire (preferably not wet sand!!!) Now let the embers be smothered under the sand. When everything has cooled down enough, dig out your charred pieces of wood again.
If you have made a fire in a hole in the ground, it is also possible to cover the hole with wood and leaves, then finally throw sand on top. This way you avoid most of the sand in your charred material.
Enjoy and have fun with your punk wood project!


