Chicken over the Campfire aka Pip-on-a-Stick
There is nothing more enchanting than cooking over a campfire. However, there is one dish that I still think surpasses many others, and that is chicken over the campfire. I usually call it "pip-on-a-stick" because it just sounds better and makes people smile.
So how do you make chicken over the campfire?
The process is basically quite simple, but depending on your time and interest, you can adjust the complexity. Naturally, you need a chicken, and in this example, we bought one weighing 1,200 grams. Then you get started cutting, chopping, and slicing. The setup itself is almost the most fun part and also the part that takes quite a bit of effort and energy. Eat some food and snack well while you enjoy the project. That way, chicken over the campfire becomes a fun activity that also stimulates your brain in a different way.
Others also read: How to Make Homemade Beef Jerky
Note: By >> clicking here << you can get direct notifications next time there are great guides on the blog.
How long does it take to make pip-on-a-stick?
The bigger it is, the longer it takes. Our chicken was ready and tasty in just over three hours. However, that’s not very useful information because wind and weather play a huge role. So do your skills as a fire master and how hard you keep the fire going. Personal experience shows it takes between 3-4 hours and that you should turn the chicken every fifteen minutes.
Flames or embers?
Either way, you get flames because you’re making a campfire... right!? The embers are also good because they provide a steady and more even heat. It should be fairly strong. The flames can flare up when fat from the chicken drips down, and that’s okay. If you put your hand under the chicken, it should get uncomfortable pretty quickly. Otherwise, it’s not hot enough.
The construction for chicken over the campfire

To make the rotisserie setup you need the following
- A long and fairly straight branch, about 35-45 mm thick. This is what the chicken will be mounted on.
- A Y-shaped branch that serves as one of the two holders.
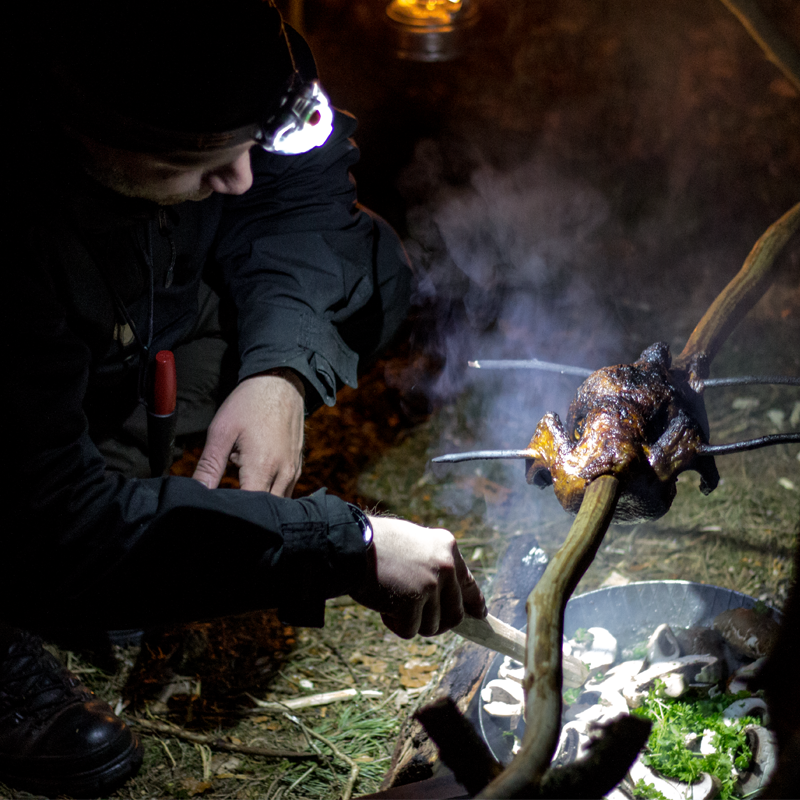
- A straight and thick branch. This is the one you see in the picture above.
1#. It needs to be debarked, and if you have a knife with a straight edge on the back, you can easily scrape off the bark. The reason for removing the bark is that the wood underneath is clean. The chicken goes over the branch, and if you use a branch with bark on it, you’re introducing a lot of bacteria into the chicken.
READ ALSO: Bake delicious Bannock bread on the fire - see the guide here
You create the square shape by sawing into the branch with your folding saw. We used a Bacho Laplander. Make 3 x 4 cuts and then carve with your knife using the "baton" technique. You can find plenty of videos on YouTube demonstrating this. Alternatively, you can carve your way to the square shape, but that takes tiiiiiime!
2# Sharpen the Y-shaped branch and hammer it into the ground. This is the simplest part of the whole setup. The right height depends on how big a fire you make. Our horizontal branch was about 40 cm above the ground.
3#. Sharpen the straight and thick branch as well, just like the Y-shaped one. Before you start making notches in it, hammer it firmly into the ground. Then saw two crosses intersecting each other and finally two cuts straight down. This way, you get a square shape with only a small point at the bottom pointing up.

When mounting the chicken, it’s important that...
You make sure it doesn’t slip around. There are many tricks for this, and the sure solution is to run one or two sticks through it. The bulletproof solution is to run the cross sticks ALL the way through, both the thick branch and the chicken. That’s what we did, but in many cases, less can also do the job.
Chicken over the campfire is done when the juice runs clear
The same rules as at home. If blood runs out when you cut into it, the animal isn’t fully cooked, and you risk getting a stomach ache. Buy salmonella-free poultry and make sure to maintain good hand hygiene.
As always, the A.S.F principle applies = Common Sense.
Bonus info
You don’t necessarily have to season the bird, but salt and pepper have never hurt anyone. The fire itself adds a wonderful flavor. In the deep quiet of the forest, you often find plenty of wild garlic, and that tastes great too! Pick wild garlic from the forest floor and chop it finely. Mix it with butter and gently slip it under the skin. This gives a delicious crispy skin and a garlic flavor without the afterward bad breath.
- Bon appétit
Would you like to be notified next time there are new blog posts?
P.S. You can get direct notifications next time there’s something new on the blog?
All you have to do is click here, and a signup box will appear :) You’ll also get a discount code giving you 100 kroner off your first order over 699 kroner. There are many benefits to the newsletter!
Survivalstore.dk
Alt andet end fyr og gran. Om du bruger eg, bøg, ask, birk betyder ikke det store. Bare hold dig fra nåletræerne. De kan nemlig godt give noget uønsket smag.
Michael
Hvilke træsort kan man bedst anvende til pinden, der går gennem kyllingen. Jeg tænker det skal være noget uden for meget harpiks.